MScratch and Wear Testing with the NanoTest Scanning Module
|
Key Features wear testing with multi-pass scratch technique scheduling software for maximum productivity - programming multiple scratches on multiple samples accurate repositioning technique |
|
|
Applications
|
|
|
Scratch Testing
The NanoTest pendulum design is superior for scratch testing since deformation of the pivot is negligible, even with very high forces, giving accurate probe displacement results. For example, sequential constant load scratches over the same wear track, with a low load topography measurement performed between each scratch, allow acquisition of elastic and plastic depth and friction data and the subsequent investigation of friction and adhesion failure mechanisms. Data is acquired, analysed, displayed in real time, and stored under the control of a comprehensive software package. Six parameters can be recorded (load, depth, transverse displacement, frictional force, acoustic emission and time), to provide a wealth of information about the surface. Analysis is simplified with comprehensive, fully automatic software; all that is required of the operator is to specify the type of analysis required. For flexibility, data is saved in ASCII format for spreadsheet and graphics export . |
|
|
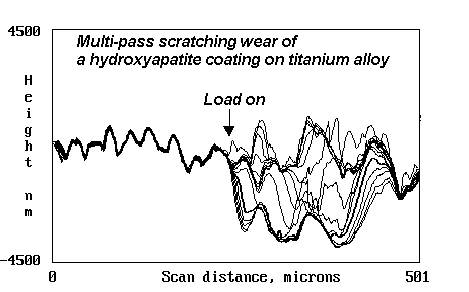
"...Wear processes can be investigated with the multi-pass scratch
technique..." ...clearly, the success of such a procedure depends on the ability to precisely and automatically relocate the stylus at the same starting point prior to each step... |
|
|
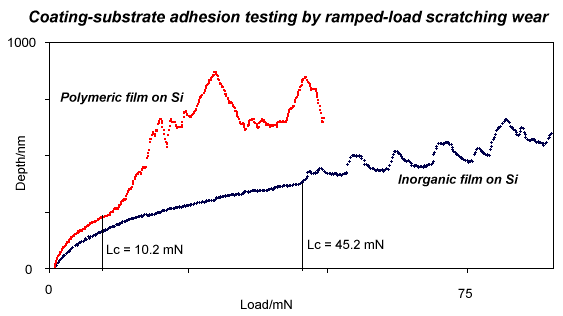
Measuring Coating-Substrate Adhesion Strength by Scratch Testing The diamond probe is scanned across
the surface under either a constant load or a progressively increasing load
until film failure occurs. Scratching at different locations at constant
load can be used to investigate coating quality and homogeneity. In the example shown below, scratch testing with the NanoTest Scanning Module reveals clear quantitative differences in wear-resistance between thin polymeric and inorganic coatings on the same substrate. |
|
|
|
|


