Application Notes
NanoTest Indentation Analysis
|
General Response to Indentation When a material which experiences both elastic and plastic deformation is strained by indentation, the behaviour during the loading-unloading cycle is determined by the degree of imposed strain relative to the yield strain. For a pyramidal indenter, the representative imposed strain is given by: e r = 0.2 tanb where b is the angle between the face of the indenter and the original surface. The yield strain is given by Y/E, where E is Young's modulus and Y is the yield stress. For many indentations:
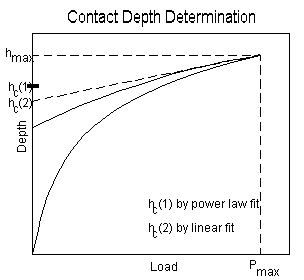
Hardness and Modulus: Linear Fitting The Meyer hardness is defined by H = Pmax / Amax where Pmax is the maximum load and Amax is the projected contact area at maximum load calculated from the contact depth hc. For a material exhibiting elastic recovery, it is assumed that the contact area between the indenter and the material remains constant and moves elastically during unloading. A further assumption is that the plastic area is always equal to the contact area; in practice, the plastic area may be larger or smaller. For a constant cylindrical contact area, the elastic recovery in this case is described by the equation:
P = 2Erad e (Eq. 1) where Linear unloading down to the contact depth hc at zero load is predicted. This is never observed since the indent begins to "open", i.e., "a" changes, leading to a departure from linearity which is greater in materials with a higher H:E ratio. However, the initial part of the curve is reasonably linear for most materials, and the plastic depth is therefore defined by fitting the first 20% of the data points to a straight line, extrapolating this to zero load, and taking the intercept on the depth axis as the final plastic depth. For a homogeneous material and a perfect indenter geometry, an Elastic Recovery Parameter, R, is defined. This, which is indicative of the slope of the unloading curve, is related to the H:E ratio as follows: R = (hmax - hc)/hc = H(1 - n 2)(kp )0.5/2E where k is a diamond geometry factor. From Eq. 1, the unloading slope is given by: C = p 0.5/(2ErA0.5) (Eq. 2) After correction of the data for frame compliance, this allows the modulus of the material to be determined. Hardness and Modulus: Power Law Fitting After frame compliance correction, the Depth vs. Load raw data is fitted to a power law expression of the form P = a(h - hf)m where a, hf and m are constants. This is justified on the basis of elasticity theory. The true contact depth is then determined from the expression: hc = hmax - e (CPmax) where C is the contact compliance equal to the tangent at maximum load. The value of e depends on the indenter geometry, e.g., for a paraboloid of revolution it is 0.75. Experimentally, the Berkovitch diamond produces the elastic recovery behaviour expected of a paraboloid of rotation
|
|
Diamond Area and Frame Compliance Calibration No diamond is perfectly sharp, so it is necessary to determine the real contact area as a function of contact depth. The NanoTest has an automatic procedure for this which utilises results from a series of indentations performed at different loads in fused silica. Using measured contact compliance values and literature values for the properties of fused silica (E = 72 GPa and n = 0.17), Eq. 2 allows a series of contact area values to be calculated. A least squares fitting procedure is then used to obtain a quadratic diamond area function given by A = ahc2 + bhc, where a and b are constants and hc is the contact depth. An ideal Berkovitch indenter has a contact area given by A = 24.5hc2. For the determination of material elastic properties, it is necessary to subtract any small elastic deformation of the instrument itself. In the NanoTest, automatic frame compliance determination is based on elastic recovery data obtained from well-documented reference materials. Again, fused silica is normally used. |
